안드로이드 스튜디오에서 기본으로 제공하는 글꼴 외에도 자기가 원하는 글꼴을 적용하고 싶을때가 있다.
그럴때는 해당 글꼴의 .ttf or .otf 파일을 안드로이드 스튜디오에 넣어줌으로써 해당 글꼴을 적용할 수 있다.
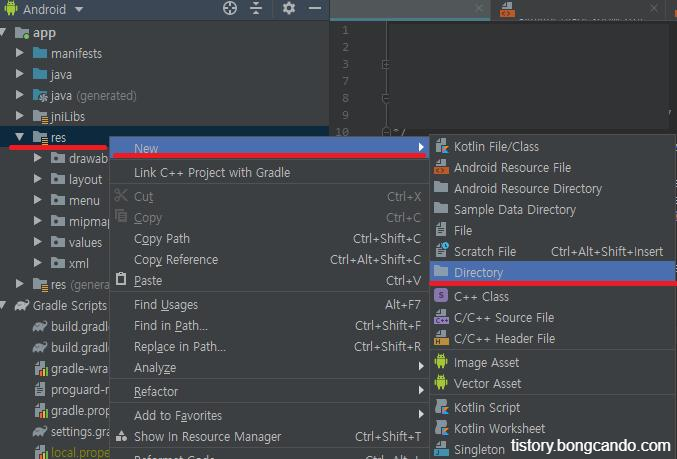
1. 폰트 디렉토리 생성
폰트를 추가하기 위해서는 먼저, /res/font/ 아래에 추가를 해야하는데 font폴더가 없을경우
res -> New -> Directory 로 폴더를 생성해준다.

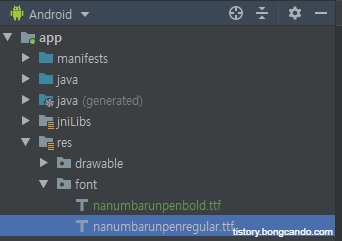
2. 폰트 넣어주기
그 다음 font 디렉토리에 적용하고 싶은 글꼴의 .ttf 파일을 넣어준다. (ctrl + c -> ctrl+v)
이때, 폰트 명을 반드시 소문자로 바꿔 주어야 한다 !!
(대문자가 포함되어있을 시 파일을 옮긴 후 Refactor 혹은 옮기기 전에 파일명 소문자로 수정 후 옮겨주기)
3. 글꼴 적용하기
<TextView
        android:layout_width="match_parent"
        android:layout_height="wrap_content"
        android:text="폰트 변경"
        android:fontFamily="@font/nanumbarunpenbold"/>
글꼴을 적용하고 싶은 곳에 android:fontFamily 옵션을 통해서 적용할 수 있다.
4. 글꼴 일괄 적용하기
특정 TextView나 EditText에만 글꼴을 적용하는것이 아닌 기본 글꼴을 변경할 수도 있다.
먼저, font폴더에 Font resource file을 생성한다.

5. Font resource file 구현
Font resource File은 API 26 이상부터 지원하기 때문에 그보다 낮은 버전에서도 적용하기 위해 app namespace를 사용한다.
아래처럼 custom font-family를 작성한다.
font : 사용할 글꼴의 리소스 위치
fontStyle : 해당 글꼴의 스타일
fontWeight : 글꼴의 굵기
<?xml version="1.0" encoding="utf-8"?>
<font-family
    xmlns:android="http://schemas.android.com/apk/res/android"
    xmlns:app="http://schemas.android.com/apk/res-auto">

    <!--regular-->
    <font
        android:font="@font/nanumbarunpenregular"
        android:fontStyle="normal"
        android:fontWeight="400"
        app:font="@font/nanumbarunpenregular"
        app:fontStyle="normal"
        app:fontWeight="500" />

    <!--bold-->
    <font
        android:font="@font/nanumbarunpenbold"
        android:fontStyle="normal"
        android:fontWeight="700"
        app:font="@font/nanumbarunpenbold"
        app:fontStyle="normal"
        app:fontWeight="1000" />


</font-family>
/res/font/custom_font_family.xml
6. style.xml에 custom font-family 적용
style.xml에 폰트를 적용시킬 위젯(TextView, EditText 등등)들의 기본테마를 상속받아서 custom font-family style을 적용하기 위해 res/values 디렉토리에 font_style.xml파일을 생성후 다음과 같이 작성한다.
<?xml version="1.0" encoding="utf-8"?>
<resources>

    <!-- Custom font 적용 -->
    <style name="customTextViewFontStyle" parent="@android:style/Widget.DeviceDefault.TextView">
        <item name="android:fontFamily">@font/custom_font_family</item>
    </style>

    <style name="customButtonFontStyle" parent="@android:style/Widget.DeviceDefault.Button.Borderless">
        <item name="android:fontFamily">@font/custom_font_family</item>
    </style>

    <style name="customEditTextFontStyle" parent="@android:style/Widget.DeviceDefault.EditText">
        <item name="android:fontFamily">@font/custom_font_family</item>
    </style>

    <style name="customRadioButtonFontStyle" parent="@android:style/Widget.DeviceDefault.CompoundButton.RadioButton">
        <item name="android:fontFamily">@font/custom_font_family</item>
    </style>

    <style name="customCheckboxFontStyle" parent="@android:style/Widget.DeviceDefault.CompoundButton.CheckBox">
        <item name="android:fontFamily">@font/custom_font_family</item>
    </style>

</resources>
res/values/font_style.xml
+) Edittext나 다른 곳에 custom font-family가 적용되지 않을경우
<item name="android:fontFamily">@font/custom_font_family</item>위의 내용으로 대체한다.
7. custom_font_style 앱에 적용
res/values/style.xml 파일의 App Theme에 6의 스타일을 적용시킨다.
    <style name="AppTheme" parent="Theme.AppCompat.Light.NoActionBar">
        <item name="colorPrimary">@color/colorPrimary</item>
        <item name="colorPrimaryDark">@color/colorPrimaryDark</item>
        <item name="colorAccent">@color/colorAccent</item>

        <!--custom font-family 적용-->
        <item name="android:textViewStyle">@style/customTextViewFontStyle</item>
        <item name="android:buttonStyle">@style/customButtonFontStyle</item>
        <item name="android:editTextStyle">@style/customEditTextFontStyle</item>
        <item name="android:radioButtonStyle">@style/customRadioButtonFontStyle</item>
        <item name="android:checkboxStyle">@style/customCheckboxFontStyle</item>

    </style>
res/values/style.xml
8. 글꼴 적용
레이아웃의 각 뷰에서 style만 수정하여 원하는 글꼴을 사용할 수 있다.
<?xml version="1.0" encoding="utf-8"?>
<LinearLayout
    xmlns:android="http://schemas.android.com/apk/res/android"
    android:id="@+id/login_layout"
    android:layout_width="match_parent"
    android:layout_height="match_parent"
    android:padding="20dp"
    android:background="@color/colorWhite"
    android:gravity="center"
    android:orientation="vertical">

    <TextView
        android:layout_width="match_parent"
        android:layout_height="wrap_content"
        android:gravity="center_horizontal"
        android:textStyle="bold"
        android:text="네이버 나눔바른펜 Bold 적용"/>
    <TextView
        android:layout_width="match_parent"
        android:layout_height="wrap_content"
        android:gravity="center_horizontal"
        android:textStyle="normal"
        android:text="네이버 나눔바른펜 Reqular 적용"/>
</LinearLayout>

'안드로이드 > 팁' 카테고리의 다른 글
| [Android] EditText auto focus, auto 키패드 ON/OFF (0) | 2019.09.24 |
|---|---|
| [Android] EditText 밑줄(underline) 제거 및 Cursor(커서) 커스텀 (0) | 2019.09.24 |