어플리케이션 로그인 시 별도의 회원가입 없이 구글, 페이스북, 네이버 로그인과 같은 소셜 로그인 기능으로 사용자 편의를 제공할 수 있다.
그 중 구글(Google) 로그인을 구현해보자.
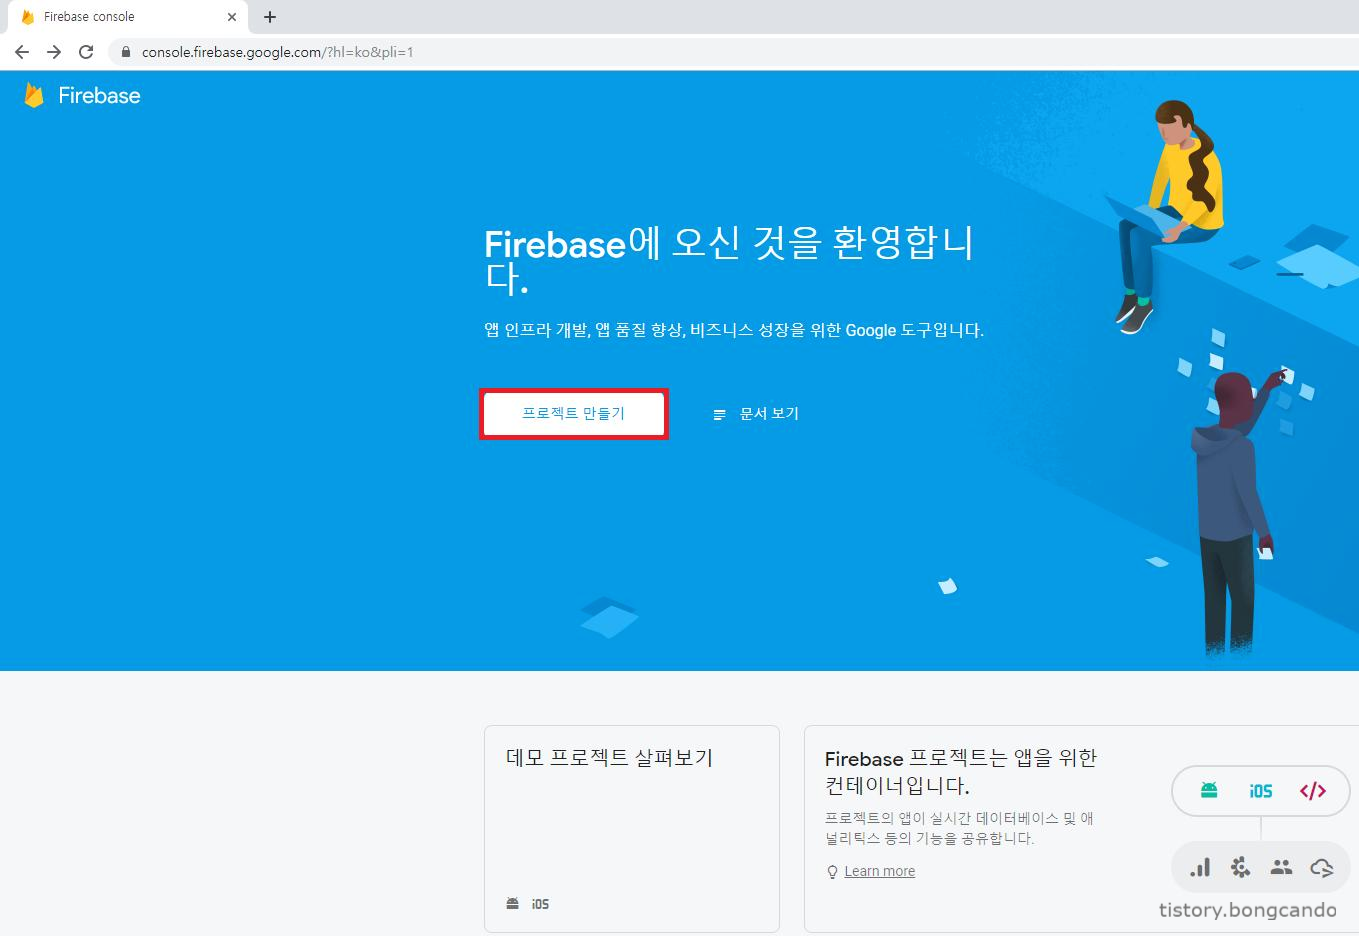
1. Firebase 프로젝트 생성
먼저, Firebase에 접속하여 프로젝트를 생성한다.
프로젝트 생성 후 Android 앱을 추가하기 위해 안드로이드 아이콘 클릭 후 Android앱에 Firebase를 추가한다.


- Android 패키지 이름은 안드로이드 스튜디오 프로젝트 실행 한 뒤,
app → manifests 에서 package = "com.~~~" 라고 되어있는 부분이 패키지 이름이다.
"" 안의 패키지 이름을 복사하여 붙여 넣는다.
- 앱 닉네임, 디버그 서명은 선택사항이지만 구글 로그인을 위해서는 디버그 서명을 해야한다.
프로젝트의 디버그 서명 인증서 SHA-1은 다음과 같이 확인할 수 있다.


SHA-1 까지 입력후 앱 등록.

google-services.json 파일을 다운로드 받고 위 사진의 경로에 넣어준다.
그 후 안드로이드 스튜디오에 Firebase SDK를 추가.

SDK 설치까지 완료했으면 4단계를 건너 뛴다.

그 다음 Firebase 프로젝트에서 Google및 이메일 사용 설정을 해준다.

2. Google 로그인 Gradle 설정
먼저, 모듈(앱 수준) Gradle 파일에 Firebase 인증 Android 라이브러리 및 Google Play서비스 종속 항목을 추가한다.
implementation 'com.google.firebase:firebase-auth:18.0.0'
implementation 'com.google.android.gms:play-services-auth:17.0.0'
3. Google Service SDK Tools 설치 및 인터넷 권한 허용
안드로이드 스튜디오 상단의 도구모음에서 다음과 같이 설정한다.

인터넷 접속을 위해 AndroidManifest.xml 파일에 인터넷 권한을 추가한다.
<?xml version="1.0" encoding="utf-8"?>
<manifest xmlns:android="http://schemas.android.com/apk/res/android"
          package="com.bongcando.wherewemeet">

    <!--인터넷 권한-->
    <uses-permission android:name="android.permission.INTERNET" />

    <application
            android:allowBackup="true"
            android:icon="@mipmap/ic_launcher"
            android:label="@string/app_name"
            android:roundIcon="@mipmap/ic_launcher_round"
            android:supportsRtl="true"
            android:theme="@style/AppTheme">
        <activity android:name=".MainActivity">
            <intent-filter>
                <action android:name="android.intent.action.MAIN"/>

                <category android:name="android.intent.category.LAUNCHER"/>
            </intent-filter>
        </activity>
    </application>

</manifest>
4. XML 작성
로그인 액티비티 xml 파일에 Google 로그인을 위한 버튼을 추가한다.
<?xml version="1.0" encoding="utf-8"?>
<LinearLayout xmlns:android="http://schemas.android.com/apk/res/android"
              android:layout_width="match_parent"
              android:layout_height = "match_parent"
              android:padding="20dp"
              android:background="@color/colorWhite"
              android:gravity="center"
              android:orientation="vertical">

<LinearLayout
        android:layout_width="match_parent"
        android:layout_height="100dp"
        android:orientation="vertical">
    <EditText
            android:layout_width="match_parent"
            android:layout_height="50dp"
            android:inputType="text"
            android:hint="@string/id_req"
            android:layout_gravity="center"/>
    <EditText
            android:layout_width="match_parent"
            android:layout_height="50dp"
            android:inputType="textPassword"
            android:hint="@string/pw_req"
            android:layout_gravity="center"/>
</LinearLayout>

<LinearLayout
        android:layout_width="match_parent"
        android:layout_height="wrap_content"
        android:orientation="horizontal">
    <Button
            android:layout_width="wrap_content"
            android:layout_height="wrap_content"
            android:text="@string/btn_login"
            android:layout_weight="1"/>
    <Button
            android:layout_width="wrap_content"
            android:layout_height="wrap_content"
            android:text="@string/btn_registration"
            android:layout_weight="1"/>
</LinearLayout>

<!--Google Sign In 부분-->
<com.google.android.gms.common.SignInButton
        android:id="@+id/btn_googleSignIn"
        android:layout_width="match_parent"
        android:layout_height="wrap_content"
        android:layout_marginTop="10dp">
</com.google.android.gms.common.SignInButton>
</LinearLayout>

위과 같이 구글 로그인 버튼이 생성된다.
5. Google Login Activity 작성
구글 로그인 버튼클릭시 작동될 메써드들을 작성해준다.
class LoginActivity : AppCompatActivity(),View.OnClickListener {


    //firebase Auth
    private lateinit var firebaseAuth: FirebaseAuth
    //google client
    private lateinit var googleSignInClient: GoogleSignInClient

    //private const val TAG = "GoogleActivity"
    private val RC_SIGN_IN = 99

    override fun onCreate(savedInstanceState: Bundle?) {
        super.onCreate(savedInstanceState)
        setContentView(R.layout.activity_login)

        //btn_googleSignIn.setOnClickListener (this) // 구글 로그인 버튼
        btn_googleSignIn.setOnClickListener {signIn()}

        //Google 로그인 옵션 구성. requestIdToken 및 Email 요청
        val gso = GoogleSignInOptions.Builder(GoogleSignInOptions.DEFAULT_SIGN_IN)
            .requestIdToken(getString(R.string.default_web_client_id))
            //'R.string.default_web_client_id' 에는 본인의 클라이언트 아이디를 넣어주시면 됩니다.
            //저는 스트링을 따로 빼서 저렇게 사용했지만 스트링을 통째로 넣으셔도 됩니다.
            .requestEmail()
            .build()

        googleSignInClient = GoogleSignIn.getClient(this, gso)

        //firebase auth 객체
        firebaseAuth = FirebaseAuth.getInstance()
    }

    // onStart. 유저가 앱에 이미 구글 로그인을 했는지 확인
    public override fun onStart() {
        super.onStart()
        val account = GoogleSignIn.getLastSignedInAccount(this)
        if(account!==null){ // 이미 로그인 되어있을시 바로 메인 액티비티로 이동
            toMainActivity(firebaseAuth.currentUser)
        }
    } //onStart End

    // onActivityResult
    public override fun onActivityResult(requestCode: Int, resultCode: Int, data: Intent?) {
        super.onActivityResult(requestCode, resultCode, data)

        // Result returned from launching the Intent from GoogleSignInApi.getSignInIntent(...);
        if (requestCode == RC_SIGN_IN) {
            val task = GoogleSignIn.getSignedInAccountFromIntent(data)
            try {
                // Google Sign In was successful, authenticate with Firebase
                val account = task.getResult(ApiException::class.java)
                firebaseAuthWithGoogle(account!!)

            } catch (e: ApiException) {
                // Google Sign In failed, update UI appropriately
                Log.w("LoginActivity", "Google sign in failed", e)
            }
        }
    } // onActivityResult End

    // firebaseAuthWithGoogle
    private fun firebaseAuthWithGoogle(acct: GoogleSignInAccount) {
        Log.d("LoginActivity", "firebaseAuthWithGoogle:" + acct.id!!)

        //Google SignInAccount 객체에서 ID 토큰을 가져와서 Firebase Auth로 교환하고 Firebase에 인증
        val credential = GoogleAuthProvider.getCredential(acct.idToken, null)
        firebaseAuth.signInWithCredential(credential)
            .addOnCompleteListener(this) { task ->
                if (task.isSuccessful) {
                    Log.w("LoginActivity", "firebaseAuthWithGoogle 성공", task.exception)
                    toMainActivity(firebaseAuth?.currentUser)
                } else {
                    Log.w("LoginActivity", "firebaseAuthWithGoogle 실패", task.exception)
                    Snackbar.make(login_layout, "로그인에 실패하였습니다.", Snackbar.LENGTH_SHORT).show()
                }
            }
    }// firebaseAuthWithGoogle END


    // toMainActivity
    fun toMainActivity(user: FirebaseUser?) {
        if(user !=null) { // MainActivity 로 이동
            startActivity(Intent(this, MainActivity::class.java))
            finish()
        }
    } // toMainActivity End

    // signIn
    private fun signIn() {
        val signInIntent = googleSignInClient.signInIntent
        startActivityForResult(signInIntent, RC_SIGN_IN)
    }
    // signIn End

    override fun onClick(p0: View?) {
    }


    private fun signOut() { // 로그아웃
        // Firebase sign out
        firebaseAuth.signOut()

        // Google sign out
        googleSignInClient.signOut().addOnCompleteListener(this) {
            //updateUI(null)
        }
    }

    private fun revokeAccess() { //회원탈퇴
        // Firebase sign out
        firebaseAuth.signOut()
        googleSignInClient.revokeAccess().addOnCompleteListener(this) {

        }
    }

}
signOut(), revokeAccess() 메서드는 원하는 곳에 버튼을 만들어서 구현하면 된다.
구글로그인 버튼 클릭시 구글계정으로 로그인할 수 있으며, 한번 로그인 후에는 바로 메인 액티비티로 넘어가게 된다.

로그인이 정상적으로 되었다면 Firebase 프로젝트 콘솔에서 로그인한 계정을 확인할 수 있다.

참고자료
https://firebase.google.com/docs/android/setup?hl=ko
Android 프로젝트에 Firebase 추가 | Firebase
시작하기 전에 Android 스튜디오를 설치하거나 최신 버전으로 업데이트합니다. Android 앱이 다음을 충족하는지 확인합니다. API 수준 16(Jelly Bean) 이상 타겟팅 Gradle 4.1 이상 사용 앱을 실행할 기기 또는 에뮬레이터를 설정합니다. Google Play가 포함된 에뮬레이터 이미지를 에뮬레이터에서 사용해야 합니다. Google 계정을 사용하여 Firebase에 로그인합니다. Android 앱 프로젝트가 준비되지 않았다면 빠른 시
firebase.google.com
https://firebase.google.com/docs/auth/android/google-signin?hl=ko
Android에서 Google 로그인을 사용하여 인증하기 | Firebase
앱에 Google 로그인을 통합하여 사용자가 Google 계정을 통해 Firebase에 인증하도록 할 수 있습니다. 시작하기 전에 아직 추가하지 않았다면 Android 프로젝트에 Firebase를 추가합니다. 프로젝트 수준 build.gradle 파일의 buildscript 및 allprojects 섹션에 Google의 Maven 저장소가 포함되어야 합니다. 다음과 같이 모듈(앱 수준) Gradle 파일(일반적으로 app/build.gradle)에 Fir
firebase.google.com
firebase/quickstart-android
Firebase Quickstart Samples for Android. Contribute to firebase/quickstart-android development by creating an account on GitHub.
github.com
'안드로이드 > 코틀린(Kotlin)' 카테고리의 다른 글
| [Android : Kotlin] 뒤로가기 두번으로 앱 종료하기 with SnackBar (0) | 2019.09.27 |
|---|---|
| [Android : Kotlin] TextInputLayout을 사용해서 EditText를 꾸며보자 (0) | 2019.09.22 |
| [Android : Kotlin] 네이버 지도 SDK를 사용해서 네이버 맵을 구현해보자 (0) | 2019.09.19 |
| [Android : Kotlin] Navigation Drawer를 사용해서 메뉴를 만들어보자 (15) | 2019.09.09 |
| [Android : Kotlin] 스플래시(Splash)화면을 만들어보자 (2) | 2019.08.18 |